How to Create a Recruitment Process Flowchart

One of the biggest challenges my recruiters face is keeping the hiring process moving.
We have had many recruiters join our team over the years and as we grew so did the need to both train new hires and to have a set procedure for existing recruiters to reference. That’s when we created a recruitment process flowchart.
Flowcharts are nothing new, but it was the first time we’d used a comprehensive one to map out all of the detailed activities involved in our hiring process. Finally, we could visualize where slowdowns were occurring and see where gaps were hurting the candidate experience. It was helpful for productivity and a game changer for our consistency and efficiency.
Streamlining your recruitment processes with a flowchart can help you hire faster with fewer wasted resources. A recruitment process flowchart can help increase clarity and accuracy around your hiring, as it did for my team. I think all recruiters should use one, so I’m breaking down everything you need to know about hiring flowcharts and sharing the steps to make one for your organization.
What Is a Recruitment Process Flowchart?
A recruitment process flowchart visually maps out the steps your company uses to identify and hire talent. In addition to documenting the steps in the hiring process, a recruitment flowchart is easy to understand at a glance, helping keep everyone on the hiring team on the same page.
A recruitment flowchart makes it easy to identify the next steps after any action during the hiring process. Either the next step happens directly, or a simple yes/no question can be used to determine the appropriate course of action.
Here’s an example of a recruitment process flowchart:
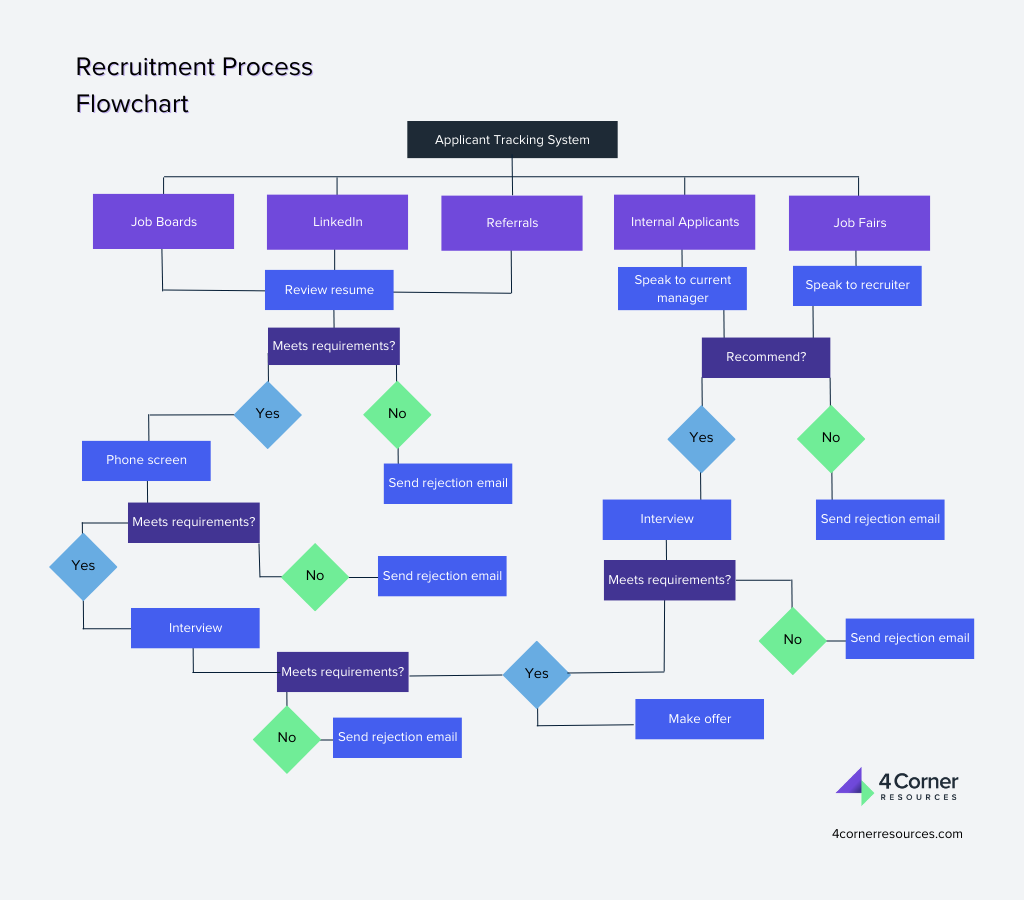
Creating a recruiting process flowchart helps streamline workflows and keep hiring moving, both of which are key to shortening your hiring timeline and winning top talent.
Why Should You Use a Flowchart for Your Hiring Process?
Using a flowchart to visualize your hiring process can help you:
Keep hiring on track
A big complaint among job seekers is that the hiring process takes too long. A lengthy hiring timeline doesn’t just contribute to a poor candidate experience, it also threatens your ability to hire the candidate you want with each additional day that goes by.
A flowchart streamlines your recruiting steps, helping you hire faster and more efficiently. It ensures that each task segues smoothly into the next and no steps are missed or delayed.
Ensure alignment among team members
How many times have you been waiting on something–a piece of information, maybe, or an approval–from a colleague, only to find out they had no idea you were waiting on them? Or worse, have you ever worked on a task and found out afterward that someone else already completed it? Ugh.
These classic communication breakdowns waste resources and derail projects. A hiring flowchart makes it easy to see who has the ball and what should be done with it next, setting clear expectations and promoting accountability.
Provide a consistent candidate experience
I’m always preaching the importance of a hiring process that’s done the same way every time.
Think of a NASCAR pit crew. They’re masters at what they do because they’ve repeated the same steps in the same order literally thousands of times. It should be the same way with your recruiting activities.
A repeatable hiring process creates a consistent candidate experience, which not only leads to more accurate hiring, but helps you avoid any legal trouble that could stem from a candidate perceiving unfair treatment.
Maintain compliance
One of our healthcare clients was rapidly hiring nurses, which is a win in this market. However, moving quickly meant they were missing key steps in the screening process like confirming necessary certifications, which is a big no-no.
We introduced a recruiting process flowchart with checkpoints for verifying credentials, completing background checks, and ensuring documentation was completed before onboarding could begin. This allowed the organization to continue hiring quickly while avoiding compliance-related issues.
Using a flowchart for your screening and assessment tasks can ensure that your team is checking every necessary box before making a hire.
Enables continuous improvement
A flowchart’s visual, easy-to-edit nature makes it the perfect medium to make tweaks over time. By changing the order, flow or number of steps in the chart, you can accelerate your time-to-hire, reduce costs, and continuously boost your efficiency.
See how our recruiting process delivers the perfect candidate for your team.
Types of Recruiting Process Flowcharts
Linear flowchart
A linear flowchart displays tasks in a line in chronological order. It’s easy to create and is a great starting point if you’re building a recruiting process flowchart for the first time. It lets you know where things stand and what activity comes next.
The downside of a linear flowchart is that it doesn’t allow you to account for activities that are taking place simultaneously, like if HR is preparing an offer letter while a hiring manager checks references. It may also be too simplistic for large teams.
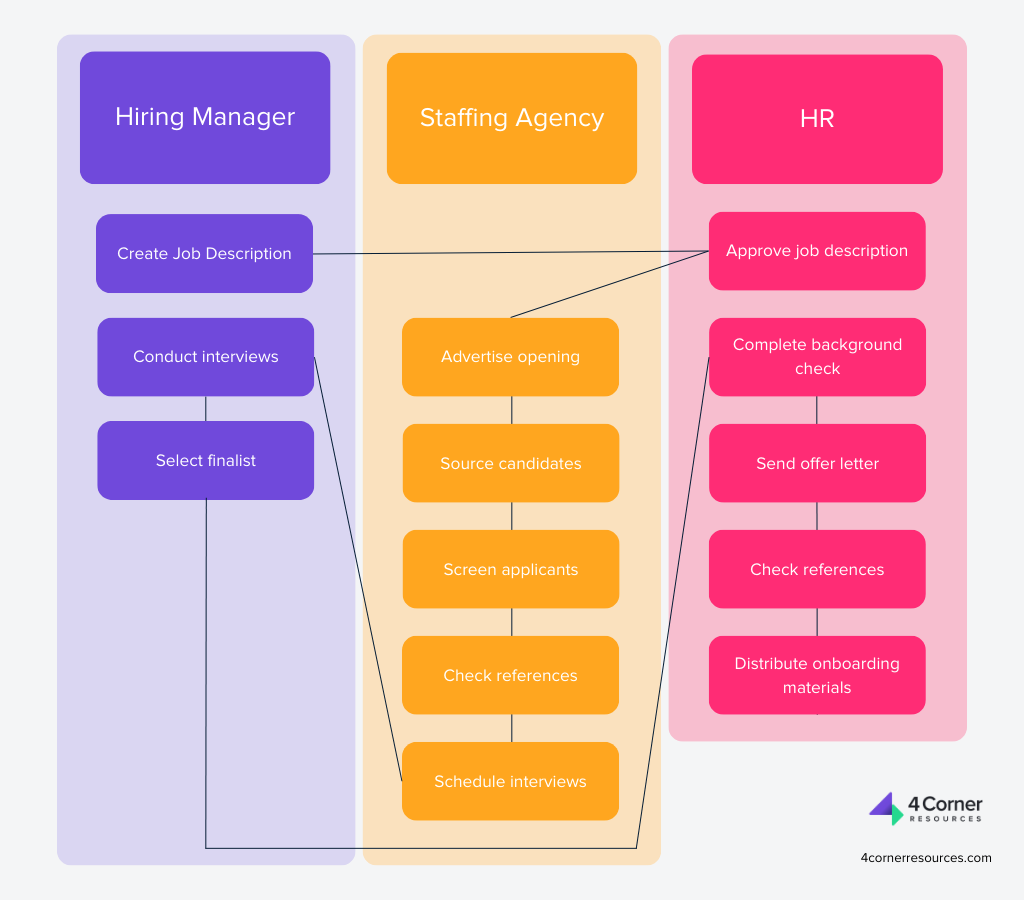
Swimlane flowchart
A swimlane flowchart displays each team member or department’s activities side by side as they occur in tandem, similar to lanes in a swimming pool. This style of flowchart helps encourage accountability and forward momentum.
Phased flowchart
This style of flowchart is broken down into phases and conveys the tasks that need to be completed during each phase. It’s a good next step from a linear flowchart when you want to visualize a more complex process or get into more detail on various activities.
Candidate journey flowchart
When you’re soliciting referrals, firing off emails, and updating your ATS, it’s easy to lose sight of what’s happening on the candidate’s side of things. A candidate journey flowchart is useful to understand your recruitment process from the candidate’s perspective. It can help you identify points where applicants are likely to drop off or where more nurturing could be beneficial.
What Are the Basic Steps in the Recruitment Process?
To make your flowchart, you’ll first need to define all of the steps in your recruitment process. It’s a good idea to start with the most major tasks and build a rough outline with them first. Then, you can get more detailed with lower-level tasks.
Here are some core steps in the recruitment process that you’ll probably want to include in your flowchart:
- Define staffing needs. Identify which roles you need to hire for and when.
- Create job description. Include the duties and required qualifications as well as information about your company culture and employee value proposition.
- Share job opening internally. Invite internal candidates to apply, share with people in their network, and submit referrals.
- Post job externally. Publish the opening to your website, job boards, social platforms, and other outlets.
- Screen candidates. Use phone screens to confirm minimum requirements and shortlist candidates to be interviewed.
- Schedule interviews. Loop in all interviewers and your ATS to automate the process.
- Conduct interviews. Talk with candidates and assess them on skills, experience, personality, and culture fit.
- Assess candidates. Complete candidate score sheets and share feedback among stakeholders.
- Make offer. Develop and send an offer letter and engage in negotiations if needed.
- Hire candidate. Set a start date, distribute new hire paperwork, and complete comboarding.
Once you’ve mapped out these high-level tasks, you can add more detail or even secondary charts to document more nuanced steps like:
- Meeting with managers to identify internal talent
- Conducting market and competitor research
- Creating recruitment marketing materials
- Going back through old resumes on file to look for suitable candidates
- Running paid ads
- Conducting outreach on LinkedIn
- Developing interview questions
- Communicating your company culture
- Interfacing with HR
- Analyzing hiring data
- Conducting candidate feedback surveys
- Incorporating processes for hiring temporary and contract workers
- Onboarding new hires
How to Make a Flowchart
Once you’ve listed the tasks in your recruiting process, follow these steps to build out your flowchart.
1. Determine the order of processes and any if/thens
The beauty of a flowchart is that it makes the order of processes abundantly clear. So, lay out your recruiting steps chronologically. When you make your flowchart, an arrow will indicate the subsequent step in the process.
Be sure to consider if/then scenarios (if X happens, then we must do Y), requiring you to add a yes/no question to your flowchart that branches off into two or more possible outcomes.
Related: How to Set Priorities When Recruiting Employees
2. Build a rough outline
Your flowchart can include horizontal and vertical movement and different shapes and colors. Typically, each shape is designated for a certain type of step (e.g., a diamond for a yes/no question, a square for a process). Color coding can be useful for assigning the responsible party (e.g., green for an HR task, orange for a hiring manager task).
During this step, it can be helpful to use post-its to build a live version of your flowchart and play around with different arrangements before you spend time mapping it out on a computer.
3. Finalize it with a flowchart program
While you may want to call in a graphic designer to make an aesthetically pleasing version of your diagram, we recommend building it in a program that’s specifically designed for flowcharts because it will be easier to make changes as your process evolves.
Lucidchart is a user-friendly option that allows you to build, save, and share up to three flowcharts for free. There are plenty of other free and paid flowchart apps you can find by searching online, as well.
Recruitment Process Flowchart Tips
Add text boxes
Your flowchart steps don’t have to be limited to a few words. Consider adding small text boxes under some of them to give additional detail/context where needed.
Keep it on one page
Flowcharts should be detailed yet simple. To avoid confusion, limit the design to a single page. If you’re running out of space, break your process down into phases (e.g., sourcing, screening, interviewing, offer) and give each one its own page.
Build out individual processes
Warning: flowcharts can be addicting! Once you’ve mapped your overall recruiting process, you might create additional charts to map out individual steps, like a flowchart for the interview process or candidate communications.
Continuously refine and optimize
Your recruitment process flowchart should be a living document, so we recommended creating it in an app that allows quick and easy modifications. Over time, you’ll probably want to make it more detailed, add missing steps, additional qualifying questions for greater clarity, and so on. Revise your flowchart each time you change one of your recruiting workflows.
Happy flowcharting!
Related: How to Set Achievable Staff Growth Goals